

前言
接着上一篇《 CentOS安装LAMP教程》,今天我们来完成第二部分:在 CentOS LAMP安装WordPress。由于LAMP环境的搭建过程已在上一篇详细介绍,这里就不再赘述了。将整个教程分成两部分,主要是为了让大家更容易消化步骤。好了,不啰嗦了,我们开始吧!
本篇使用的演示镜像系统是:CentOS Linux 7 x86_64
以下教程默认使用root用户执行命令,如果不是root用户,前面加上sudo
示例: sudo mysql -u root -p
第一步:部署 LAMP

第二步:WordPress 数据库配置
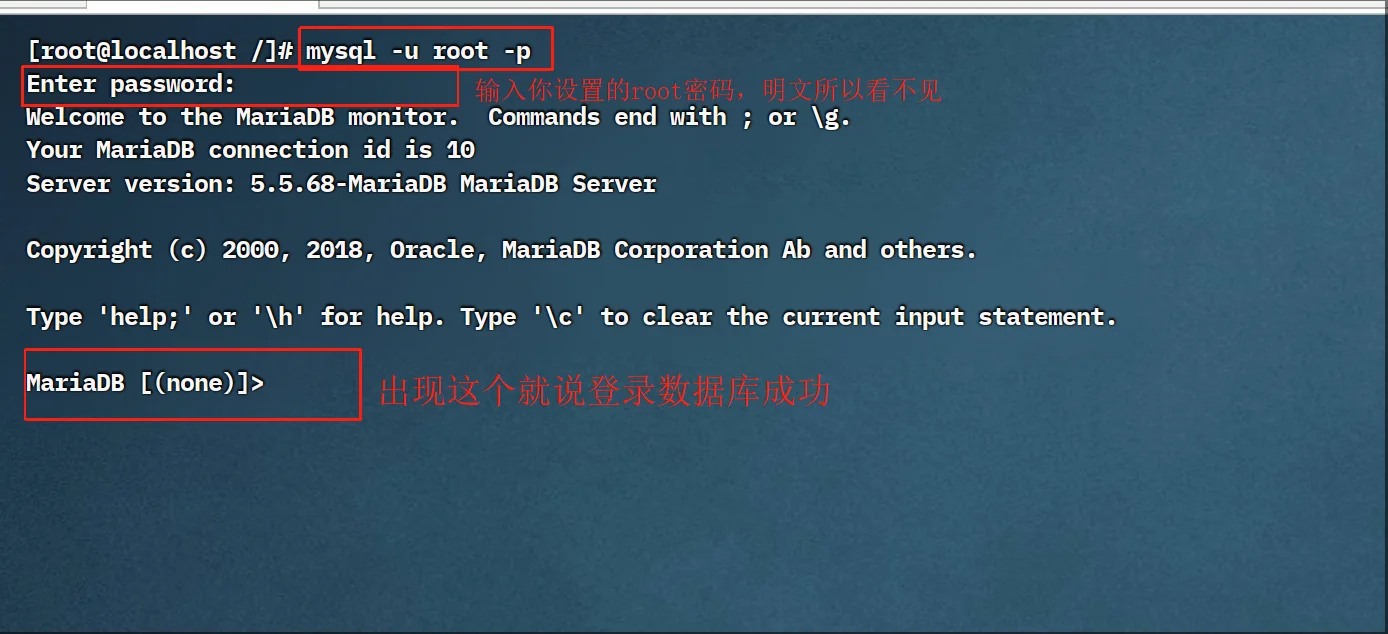
1.登录数据库
mysql -u root -p- 解释:
- 以 root 用户身份登录 MariaDB。-p 参数表示需要输入密码。
2.执行以下SQL命令来创建数据库和用户
CREATE DATABASE jiweitublog;
CREATE USER 'jiweitu'@'localhost' IDENTIFIED BY 'jiweitu666';
GRANT ALL PRIVILEGES ON jiweitublog.* TO 'jiweitu'@'localhost';
FLUSH PRIVILEGES;
EXIT;
- 解释:
- 第一行:创建一个名为 jiweitublog 的数据库。
- 第二行:创建一个名为 jiweitu 的数据库用户,并设置其密码为jiweitu666。
- 第三行:为用户 jiweitu 授予对 jiweitublog 数据库的所有权限。
- 第四行:刷新权限表,使更改生效。
- 第五行:退出 MariaDB 控制台。
![图片[2]-Centos LAMP安装WordPress-极未兔博客](https://www.jiweitublog.cn/wp-content/uploads/2025/07/7c4d70ad1920250709110553.webp)
到这里就已经完成了WordPress数据库配置
第三步:安装WordPress
1.安装解压工具
yum install unzip -y- 解释:
- yum install 安装 unzip 解压工具包,-y 并确认安装
![图片[3]-Centos LAMP安装WordPress-极未兔博客](https://www.jiweitublog.cn/wp-content/uploads/2025/07/9734e02fa020250709110829.webp)
2.下载WordPress
cd /var/www/html

wget https://cn.wordpress.org/latest-zh_CN.zip

ls -l- 解释:
- cd 切换到 web目录
- wget 下载 WordPress 官方中文安装包
- ls 列出该目录下的 -l 所有文件
![图片[4]-Centos LAMP安装WordPress-极未兔博客](https://www.jiweitublog.cn/wp-content/uploads/2025/07/5bed900ecc20250709111234.webp)
3.解压Wordpress压缩包
unzip latest-zh_CN.zip

rm -rf latest-zh_CN.zip - 解释:
- unzip 解压 latest-zh_cn.zip 安装包
- rm 删除 -rf 递归强制删除 latest-zh_cn.zip 安装包
![图片[5]-Centos LAMP安装WordPress-极未兔博客](https://www.jiweitublog.cn/wp-content/uploads/2025/07/6f38bbbf6620250709111850.webp)
4.移动web运行目录
mv /var/www/html/wordpress/* /var/www/html/
rm -rf /var/www/html/wordpress
ls -l- 解释:
- mv 移动
/var/www/html/wordpress/*目录下的所有文件到/var/www/html/目录下面 - rm 删除 -rf 递归强子删除 wordprss 文件夹。(因为已经移动到 html 里面了所以 wordpress 的文件可以删除,因为是空文件夹,留着也没用)
- ls 列出目录下的 -l 所有文件
- mv 移动
![图片[6]-Centos LAMP安装WordPress-极未兔博客](https://www.jiweitublog.cn/wp-content/uploads/2025/07/7709b9f30e20250709111709.webp)
5.复制wp-config.php
cp wp-config-sample.php wp-config.php

ls -l- 解释:
- cp 复制
wp-config-sample.php文件重命名wp-config.php - ls 列出目录下的 -l 所有文件
- cp 复制
![图片[7]-Centos LAMP安装WordPress-极未兔博客](https://www.jiweitublog.cn/wp-content/uploads/2025/07/d1c19e7f9c20250709112351.webp)
6.设置文件权限
chmod -R 755 /var/www/html
chown -R apache:apache /var/www/html
ls -l- 解释:
- 给/var/www/html 目录的文件夹,chmod 设置文件夹权限,-R 递归目录下所有的文件,755 读写执权限
- 给/var/www/html 目录的文件夹,chown 设置 apache用户,aoache组 -R 递归目录下所有的文件
- ls 列出目录下的 -l 所有文件
![图片[8]-Centos LAMP安装WordPress-极未兔博客](https://www.jiweitublog.cn/wp-content/uploads/2025/07/72d016950020250709113020.webp)
7.编辑wp-config.php文件
分享一篇详细的 vim 工具使用教程:https://cloud.tencent.com/developer/article/1561564
vi /var/www/html/wp-config.php- 解释:
- vi 编辑
/var/www/html/wp-config.php文件
- vi 编辑
修改下面的内容
define( 'DB_NAME', 'database_name_here' );
define( 'DB_USER', 'username_here' );
define( 'DB_PASSWORD', 'password_here' );
修改为
# 刚刚创建数据库
define( 'DB_NAME', 'jiweitublog' );

# 刚刚创建的数据库用户
define( 'DB_USER', 'jiweitu' );

# 刚刚创建的数据库密码
define( 'DB_PASSWORD', 'jiweitu666' );![图片[9]-Centos LAMP安装WordPress-极未兔博客](https://www.jiweitublog.cn/wp-content/uploads/2025/07/316c9ea6ad20250709114421.webp)
![图片[10]-Centos LAMP安装WordPress-极未兔博客](https://www.jiweitublog.cn/wp-content/uploads/2025/07/57759a497620250709114400.webp)
8.重启Apache
systemctl restart httpd

systemctl status httpd- 解释:
- restart 重启 httpd 服务
- status 查看 httpd 服务状态
![图片[11]-Centos LAMP安装WordPress-极未兔博客](https://www.jiweitublog.cn/wp-content/uploads/2025/07/ee3604f17e20250709114912.webp)
9.部署安装完成
域名解析好后,打开你的域名就可以了
![图片[12]-Centos LAMP安装WordPress-极未兔博客](https://www.jiweitublog.cn/wp-content/uploads/2025/07/d2b5ca33bd20250709134528.webp)
到这已经完成了 WordPress 安装
第四步:Apache伪静态设置
1.创建虚拟主机配置文件
vi /etc/httpd/conf.d/jiweitu.conf- 解释:
- 在 /etc/httpd/conf.d/ 目录下 vi 编辑/创建 jiweitu.conf 文件
2.文件内容
<VirtualHost *:80>
    ServerName site1.com
    DocumentRoot /var/www/site1.com
    <Directory /var/www/site1.com>
        AllowOverride All
        Require all granted
        DirectoryIndex index.php index.html
    </Directory>
    ErrorLog /var/log/httpd/site1.com-error.log
    CustomLog /var/log/httpd/site1.com-access.log combined
</VirtualHost>- 解释:
ServerName:定义站点的主机名。DocumentRoot:指定站点的根目录。AllowOverride All:允许 .htaccess 文件覆盖 Apache 配置。Require all granted:允许所有客户端访问这个目录(如果没有它,Apache 可能403)。DirectoryIndex index.php index.html:- 设置默认访问的首页文件,按顺序查找
index.php、然后index.html。
- 设置默认访问的首页文件,按顺序查找
ErrorLog和CustomLog:指定日志文件的位置。
3.以下是我的根目录和域名为例,下面是修改后的文件
比如我的域名是 jiweitublog.cn,文件的路径 /var/www/html
<VirtualHost *:80>
    ServerName www.jiweitublog.cn/
    DocumentRoot /var/www/html
    <Directory /var/www/html>
        AllowOverride All
        Require all granted
        DirectoryIndex index.php index.html
    </Directory>
    ErrorLog /var/log/httpd/jiweitublog_cn-error.log
    CustomLog /var/log/httpd/jiweitublog_cn-access.log combined
</VirtualHost>![图片[13]-Centos LAMP安装WordPress-极未兔博客](https://www.jiweitublog.cn/wp-content/uploads/2025/07/a100cc06b420250709140434.webp)
4.重启Apache
systemctl restart httpd

systemctl status httpd- 解释:
- restart 重启 httpd 服务
- status 查看 httpd 服务状态
5.设置Wordpress固定链接
![图片[15]-Centos LAMP安装WordPress-极未兔博客](https://www.jiweitublog.cn/wp-content/uploads/2025/07/d8daa5da4420250709140934.webp)
6.打开文章页面是否能正常打开
![图片[16]-Centos LAMP安装WordPress-极未兔博客](https://www.jiweitublog.cn/wp-content/uploads/2025/07/d2b5ca33bd20250709142445.webp)
扩展:.htaccess文件写入不了解决方法
如果出现:文件权限和组都给了,还是写入不了 .htaccess 文件。下面给了
![图片[17]-Centos LAMP安装WordPress-极未兔博客](https://www.jiweitublog.cn/wp-content/uploads/2025/07/d2b5ca33bd20250709142558.webp)
检查SELinux
在CentOS系统上,检查SELinux是否开启及其当前模式(强制、宽容或关闭)
sestatus- 解释:
- SELinux status: 这会明确告诉你 SELinux 是 “
enabled”(已启用)还是 “disabled”(已禁用)。 - Current mode: 这会显示 SELinux 当前运行的模式:
enforcing:强制模式,这是最严格的安全模式,会阻止并记录违反安全策略的行为permissive:宽容模式,SELinux 会记录违反安全策略的行为,但不会阻止它们。这通常用于调试disabled:SELinux 已完全关闭
- SELinux status: 这会明确告诉你 SELinux 是 “
![图片[18]-Centos LAMP安装WordPress-极未兔博客](https://www.jiweitublog.cn/wp-content/uploads/2025/07/d2b5ca33bd20250709143436.webp)
方法一:
临时禁用SELinux测试(不推荐长期使用)
注意:这个更改是临时的,重启服务器后会恢复到 /etc/selinux/config 中定义的模式。
setenforce 0
方法二:(推荐)
修复SELinux上下文(推荐)
# 1. 修改目录的 SELinux 上下文类型
semanage fcontext -a -t httpd_sys_rw_content_t "/var/www/html(/.*)?"

# 2. 立即应用新上下文
restorecon -R -v /var/www/html

# 3. 验证上下文(应看到 httpd_sys_rw_content_t)
ls -dZ /var/www/html- 原理:
- 默认
httpd_sys_content_t类型禁止写入,httpd_sys_rw_content_t允许Apache写入
- 默认
方法三:
1.手动创建 .htaccess 文件,并且输入伪静态规则
touch .htaccess

ls -la- 解释:
- touch 文件 名为
.htaccess的文件 - ls 列出目录下的 -la 所有文件包括隐藏文件
![图片[19]-Centos LAMP安装WordPress-极未兔博客](https://www.jiweitublog.cn/wp-content/uploads/2025/07/88bb88574520250709144702.webp)
2.写入规则
vi .htaccess 内容:
<IfModule mod_rewrite.c>
RewriteEngine On
RewriteRule .* - [E=HTTP_AUTHORIZATION:%{HTTP:Authorization}]
RewriteBase /
RewriteRule ^index\.php$ - [L]
RewriteCond %{REQUEST_FILENAME} !-f
RewriteCond %{REQUEST_FILENAME} !-d
RewriteRule . /index.php [L]
</IfModule>![图片[20]-Centos LAMP安装WordPress-极未兔博客](https://www.jiweitublog.cn/wp-content/uploads/2025/07/499e4b1afe20250709145322.webp)
对《Centos LAMP安装WordPress》还有什么不懂的可以评论下留言,博主看到会回复!


暂无评论内容